Simplify meal planning & grocery shopping by compiling sets of recipes and their ingredients in advance! This is step 7 of 7 in the 2-Week Meal Planning series.

I keep my plans in the back of our binder-cookbook. Every night, I decide what I want for breakfast the next day from the choices in the current 2-Week Meal Plan. I love the flexibility; knowing my house is stocked with everything I need for so many recipes, we’re never bored by our options!
...and you?
How do you plan and prepare meals? Having typed it out, my system seems long and complicated, but honestly it’s just a few minutes here and there. What do you think about it?
Comment for a chance to win March's giveaway: gorgeous earrings from Pixe's Treasure Chest!
Simplify meal planning & grocery shopping by compiling sets of recipes and their ingredients in advance! This is step 6 of 7 in the 2-Week Meal Planning series.
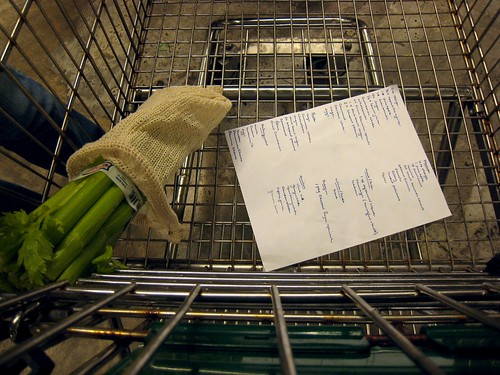 shopping list by Bruce Turner on Flickr
This part you will do more often, but still less than if you were cooking without plans!
All you do is take the step 5 list (which, if you continue with this system, you may have written years beforeheand!) and walk into your kitchen. Obviously, if you have enough, do nothing; if you don’t have any (or enough), write down what you need. I like to add fresh fruit and yogurt to all my lists as a reminder to get enough to healthily snack throughout the day. I also add household supplies as needed.
When you go shopping, buy anything that will last for the next entire two weeks.
For fruits and other perishables (which are most healthy when most fresh, anyway), pick these up as needed as often as you can - twice a week if possible for optimum nutrition, but at least once a week so they won’t go bad.
...and you?
Stephanie asked about meal planning shopping on the Sort Recipes post, and I shared some of my thoughts there. Ask your questions about what I've written so far in the comments!
Comment for a chance to win March's giveaway: gorgeous earrings from Pixe's Treasure Chest!
Simplify meal planning & grocery shopping by compiling sets of recipes and their ingredients in advance! This is step 5 of 7 in the 2-Week Meal Planning series.
Step #5: List all ingredients
One point of all this planning is to simplify shopping! Grab a piece of scrap paper and, starting with the first recipe, begin listing the ingredients and amounts. It should look something like this:
flour: 1 cup
oats: 1 cup
bananas: 2
sugar: 1/4 cup
raisins: 1/4 cup
...and so on.
Now, take your second recipe. Where the ingredients overlap, add them together. Where they don’t, start a new line:
flour: 1 cup
oats: 1 cup + 1 cup
bananas: 2
sugar: 1/4 cup
raisins: 1/4 cup + 1/8 cup
apples: 1
Continue with the rest of the recipes. Don’t worry, you won’t do this every other week, just when you start your meal planning.
If you notice an ingredient ‘straggler’ (maybe a few Tbsp of something fresh that’s only sold in larger quantitates), you may switch out a different recipe at this point.
Writing one or two 2-Week Plans for each season means we never get tired of recipes, plus they’re geared to seasonal produce (like fruit) and weather (oatmeal in the winter, granola in the summer).
Once you’ve finished all the recipes, add the lines to find the total for each ingredient. Save this list for step 6, “Go Shopping”.
...and you?
What favorite ingredients are on your list? I'm loving the thought of all the grains and fruits on mine! You can share a photo at our flickr group!
Comment for a chance to win March's giveaway: gorgeous earrings from Pixe's Treasure Chest!
Simplify meal planning & grocery shopping by compiling sets of recipes and their ingredients in advance! This is step 4 of 7 in the 2-Week Meal Planning series.

Step #4: Sort recipes
Steps 1, 2, & 3 helped you decide on which recipes to use in your 2-Week Meal Plan. What now?
Simply:
* Print out recipes from the computer
* Pull other recipes out of your family cookbook (i.e. 3-ring binder)
* Bookmark recipes in your cookbooks
That’s it.
...and you?
So go spend the time you’d usually spend reading a longer post by doing it yourself! If you haven’t already, find recipes, select recipes, choose recipes, and then follow this easy step to sort recipes.
Stay tuned for the next step where you’ll list ALL the ingredients.
Comment for a chance to win March's giveaway: gorgeous earrings from Pixe's Treasure Chest!
Simplify meal planning & grocery shopping by compiling sets of recipes and their ingredients in advance! This is step 3 of 7 in the 2-Week Meal Planning series.
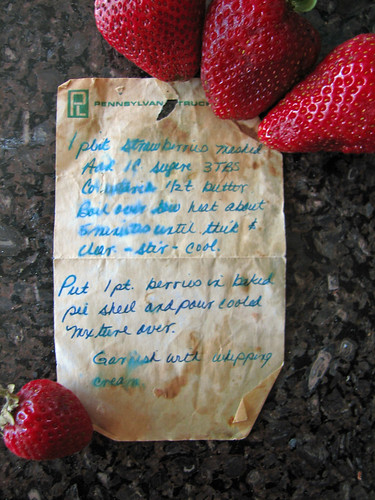
 Inside Cover from nate steiner on Flickr
Step #3: Choose recipes
If you completed Step #2, you have a lot of recipes to consider. Now it's time to narrow them down.
It’s hard to choose, so I eliminate instead. Out are recipes that:
* call for out-of-season produce
* call for a small amount of a random ingredient that none of the other recipes call for
I also look at the selection of recipes as a whole. I’m okay with one, but won’t cook two, recipes that are:
* sugary
* mostly white flour (unless I can substitute a whole grain)
I do try to prepare balanced and high-energy breakfasts, which to me means there is something with:
* (preferably whole) grain
* calcium
* fruit
* protein
I also like to try at least one new recipe a week, so two per 2-Week Meal Plan.
I should end up with enough recipes for 20 servings (10 meals for my husband and me; we eat out twice a week), which could be anywhere from 3-10 recipes (but usually 4 or 5... we like leftovers).
...and you?
If you found (or could type) any of the recipes you've chosen, comment here! It'll be fun to see what everyone's cooking.
Comment for a chance to win March's giveaway: gorgeous earrings from Pixe's Treasure Chest!
Simplify meal planning & grocery shopping by compiling sets of recipes and their ingredients in advance! This is step 2 of 7 in the 2-Week Meal Planning series.

Step #2: Select recipes
Avoid the 6am "now what am I going to make for breakfast!?" Plan ahead!
Equipped with your cookbooks you gathered in Step 1: Find Recipes, you're ready to select potentials for your meal plan.
Follow along and write selected recipe names on piece of scrap paper. These aren't necessarily final, so choose as many as you'd like.
note: As an example throughout this 2-Week Meal Planning series, I'll plan 2 weeks of healthy breakfasts.
Family Cookbook
I start by scanning recipe titles in relevant sections from my family cookbook. It’s a three-ring binder, so I can pull out recipes or just note the names.
Flipping past the breakfast tab, I find pancakes, oatmeals, and other warm dishes. They worked great during the winter, but I'm ready for something different.
I pull the whole wheat carrot cake muffins and zucchini-carrot muffins from the next tab, and grab the banana bread from the bread section.
Real Cookbooks
I know them well, so I don't actually look through them, but I write down "beignets," an Artisan Bread in Five recipe which will probably be our non-healthy, sweet treat for the two weeks (I generally allow one per plan).
Delicious Cookbook
I go to my Delicious Cookbook’s breakfast section and click on the “healthy” tag to only see those bookmarks. I open recipes that sound promising in new tabs. Though at this stage I’m mostly browsing, I do avoid those tagged with fruits that are now out of season. Fresh ingredient overlap is also nice, and I try to maintain a little variety.
We eat out two breakfasts a week (strange, I know, since we don’t eat any other meals out, but South Chinese rice noodles on market days are too good to miss!), so I’m looking for at least 10 recipes.
...and you?
Keep your list of recipes you might like to try for Step #3 - Choose Recipes. Keep the healthy breakfast ideas coming... I'm loving all the ideas so far.
Simplify meal planning & grocery shopping by compiling sets of recipes and their ingredients in advance! This is step 1 in the 2-Week Meal Planning series.

Step #1: Find recipes
Good recipes aren't hard to find... as long as you start looking before it's time to start cooking!
I have three "cookbooks" I go to:
1) our family cookbook
2) our five published cookbooks
3) my delicious cookbook
In step 2 I'll tell you how I decide which recipes to even consider, but for now, I want to share where my recipes come from.
Family Cookbook
Handwritten recipes and those I print that we like are filed in a three-ring binder under handmade tabs:
breakfast * muffins * bread * drinks * soup & slow cooker * stir-fry * poultry * meat * other main * veggies & sides * sweets
Your categories may be different based on what you cook more and less, but organizing your recipes in a similar style should help you find them easily.
Real Cookbooks
You can read more about our five cookbooks in a previous post. Obviously, you'll just want to pull out whatever cookbooks you have.
Delicious Cookbook
I tag links to all the recipes I find online in delicious. Make sure your tags are useful! I tag by:
* meal: breakfast, lunch, dinner
* part: side, main, drink
* type: muffin, pancake, granola
* nutrition: grain, veggie, dairy
* ingredient: banana, carrot, butter
* trait: sweet, healthy, quick
...and you?
I need a little help. Can you share a healthy breakfast recipe? Link to or write it in the comments! You can also tag it "for:simplyla" on delicious, which will make sure it gets into my delicious cookbook.
Comment for a chance to win February's giveaway: an adorable panda pillow from My Dear Darling!
Simplify meal planning & grocery shopping by compiling sets of recipes and their ingredients in advance! Follow this series to learn how.
With spring and warmer days coming, I’m scouring my delicious bookmarks for more weather-appropriate breakfast recipes. Though I haven’t yet figured out “OAMC” (once a month cooking), I do like to plan 2 weeks at a time to simplify grocery shopping.
For the rest of February, I’ll post on the steps I go through in my 2-Week Meal Planning. Here’s an outline; if you bookmark this page, you can come back to it and I’ll link the text in each step to its how-to post.
1. Find recipes
2. Select recipes
3. Choose recipes
4. Sort recipes
5. List ingredients
6. Go shopping
7. Repeat & enjoy
...and you?
* Bookmark this post and/or subscribe to SimpleMakes to stay updated with the series. I'll link each step in the list above once its post is live!
* Help me find a recipe! I'm looking for healthy recipes for breakfast that are simple to prepare. Have a good candidate? Write or link in the comments, tag for:simplyla on delicious, or email me here. Thanks!
Comment for a chance to win February's giveaway: an adorable panda pillow from My Dear Darling!
Organizing family events always seems to be a hassle... can the new Qlubb.com help? My answer: Yes... but only if you can convince your family.

I signed up on TwitterMoms a few months back to review Qlubb.com, but then life happened (travel, class, readjusting schedules) and I never blogged about it. I did, however, start a Qlubb for the only group I could think of: my family.
We live in 2 countries, 3 states, and 5 cities. We have birthdays that are hard to remember. We plan trips that are hard to coordinate. We host Christmas exchanges that have to be planned. Most of those activities seemed to require a half-dozen emails or phone calls, so I was excited to have an online club ("Qlubb") to keep it all in one place.
I set a password (it gives the same one for every member) and began playing with the features. The birthdays I remembered, I added to the calendar. The ones I didn't, I posted a request under the "Blurbs" (kind of like an ongoing chat) feature for other people to post.
I explained how family members (especially those with cute kiddos) could upload their photos. I used the "files" section to post our 2009 Christmas gift exchange list, generated at Random.org.
And, of course, since this is a group, not a personal message center, I sent invitations to my family members.
All the above-mentioned features work great, and unlike a previous site where we hosted a family group, it actually LOOKS great, too! Stylish and clean-cut, I like being able to see everything at one glance, though there are some limitations (I can't find any way to delete things like calendars that aren't relevant for a group I run, and everyone has equal editing permissions, so I don't feel safe inviting people I don't know
The problem isn't Qlubb's layout or features, it's what happens after the invitations go out. I reworded the default invitation so it wouldn't sound spammy, and sent them out on Nov. 30, 2008. Last week, I was chatting online with one sister, resent the link to her, and she finally joined. Member number two. I've resent all the invitations, texted them, and mentioned it. No more members.
I'm not sure whether this is a Qlubb.com problem or a problem with online groups in general (though our previous Yahoo! group saw everyone join the week invitations went out). If most people are like me, I'm pretty member account-ed out from everything online these days that requires a sign-in.
I used to stick with major accounts, like one on Yahoo, that let me get into multiple features (chats, games, website, groups, email, etc.). Nowadays, it doesn't seem to be realistic (partly because the big guys seem to me to spread themselves too thin and are no longer good at all of what they do), so I have accounts all over: google, flickr, twitter, ravelry, tons of single-topic forums, bookcrossing, several social networking sites, wordpress, Amazon and multiple other online stores, several bookmarking networks... you get the picture.
But is adding yet another place to sign in too much?
...and you?
Start your own Qlubb (for a book club, a Bible study, a coffee group, or your family!), and let me know how it goes. Do people join?
Even if you don't want or need a Qlubb, what do you think about the way the internet is going? My simple life sometimes seems overburned by so much to keep track of. What about you?
Comment to enter January's giveaway: Layla Legs!
Don't forget to check out Mary's Jewelry shop on Etsy and use the 10% discount code for this month.
A home organization tip that'll make it easier to find that certain scrap of fabric, how-to instructions, or matching button next time you're ready to craft!

I started an embroidered fabric case for my husband approximately forever ago, but today finally got ready to finish it. The embroidery done, I needed to sew the lining into the case, presenting just one problem: where was everything?
Thankfully, one look in my Hobby Basket answered it all. The pre-cut lining, matching the other piece? In the Hobby Basket. The thread I picked out with the right color? In the Hobby Basket. The book with the instructions on how to sew it up? In the Hobby Basket. The scanned & printed image I used as inspiration for the embroidered picture? Okay, so I don't actually need that one anymore, but it's in the Hobby Basket, too.
I originally got the Hobby Basket idea from The Creative Family, reading that Amanda Soule keeps baskets around her house with various knitting projects at various stages. A Thanksgiving trip to a city big enough to host Ikea (my first visit to one, ever!) saw us return home with two beautifully simple (and quite affordable!) wicker baskets. Stacked on top of one another, my Hobby Basket was formed.
The top, shallow basket holds frequently-accessed supplies plus current projects. That's why it was so easy to find everything I needed, though it's been over a month since I've touched this project. The bottom, deeper basket not only brings the other up to seat-level, so I see it and am inspired to craft when I sit down, but also holds general craft supplies and projects for the future or books for crafts currently on the back-burner.
This storage solution has made my crafting less stressful, more enjoyable, and has added a homespun functional decor item to my home at the same time. Thanks for the idea, Amanda!
...and you?
Where do you keep your current projects? Do you have any storage units in your home that double as decor? Let me know I'm not talking to myself - share in the comments!
Busy people + the need for storage can all too easily equal clutter. Here's the good, the bad, and the how-to make it better from my own desk drawer experience.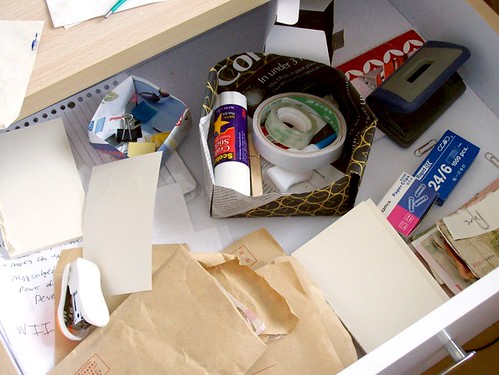
Home from vacation, it didn’t take too long to discover the dreaded desk drawer that’d become a cluttered toss-all pile weeks before we left. Looks like a home organization job to me!
I took the picture above for memory's sake before digging in.
Though not as visually frightening as some, it wasn’t working out; we spent too much time with a hand in that drawer.
The good:
Organizers (the little boxes) within organizers (the drawer) work well. Most notecards are neatly stacked. Money is either in envelopes, or paper-clipped with labels.
The bad:
Some items (stapler) are on top of unrelated items (envelopes). Loose items (paper clips) have no home. A pile of used paper meant for reuse keeps growing under the envelopes because it’s easier to get to the (store-bought, i.e. not free) notecards. The larger box is made of newspaper, so its sides don’t hold up very well.
The desk-drawer clutter $0.00 solution: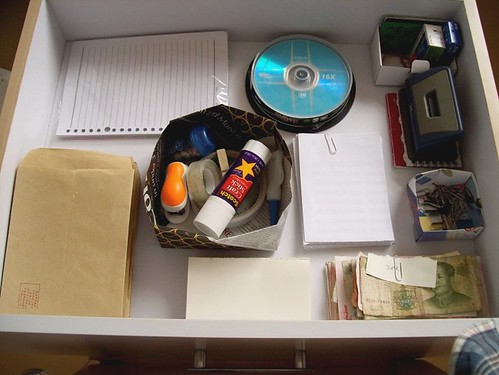
The how-to:
First, I made some decisions: “Will I really ever use this?” Though I may, someday, want a 6.75x4” piece of paper, I’ll likely be fine with just one size. I took the largest paper and divided it in 4. Just fold and tear - no need for smooth, perfectly straight edges. I took all the other paper and tore them to the same size. Smaller scraps will become recycled paper later. I clipped the new notes together and decided not to keep more than will fit in the clip - excess will be recycled too. We won’t need to buy notecards anymore, either (frugal bonus!)
Second, I got rid of loose items. I put some paperclips and staples in the smaller box. Large items go in the new, sturdier large paper box.
Third, I combined rarely-used items out of the way. See the white box in the corner? The lid was always cumbersome when I just wanted to grab or put away something, so I tucked it and the flaps inside the box. Since I have staples and paper clips out (second step), I won’t often need their boxes, so they’re tucked away back there, too. Several cards that previously floated around the room are now stuck upright in that box.
Fourth, I oriented items so nothing important overlaps. It turns out the envelopes fit better longways, for example.
Fifth and lastly, I did a visual check. Because the colorful collections of items were all on the right side of the drawer, I switched the new notepad paper with the newspaper box. Not a big deal, but it looks a little better this way.
That’s it!
...and you?
What’s your $0 organization solution that saves you bits of your precious time here and there, time that adds up? Comment for a chance to have your tip featured here on Simple Makes! Or, reorganize your desk drawer and post the before-and-after at our flickr group.
Most crafters agree they have too much craft stuff lying around, but share an organizational problem: what to do with it all? A challenge & poll led to netizen crafters' brainstorming & creativity, plus some interesting stats!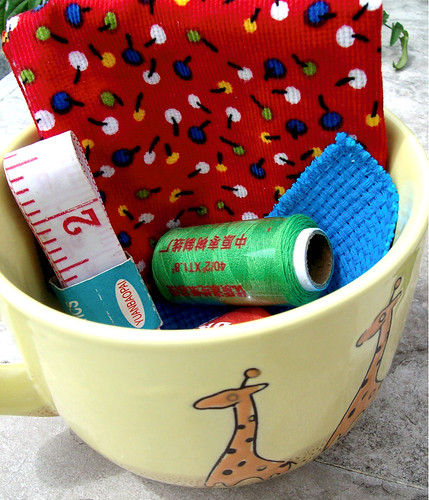
The Mugful Story
I recently began using mugs to store smaller, more frequently-accessed craft tools. This puts everything in one place while allowing me to add a fun, but functional, decor item to the room.
As I enjoyed my new crafting organization, I wondered: if all I kept to craft with had to fit in this mug, what would stay? What would go? The mug no longer just said "storage solution" to me, but also "simplify."
I asked online crafters how they would simplify their craftroom (or corner of the living room, or wherever) if they could only keep one mugful of craft tools. By “tools,” I excluded supplies (such as bolts of fabric) as well as equipment (like sewing machines).
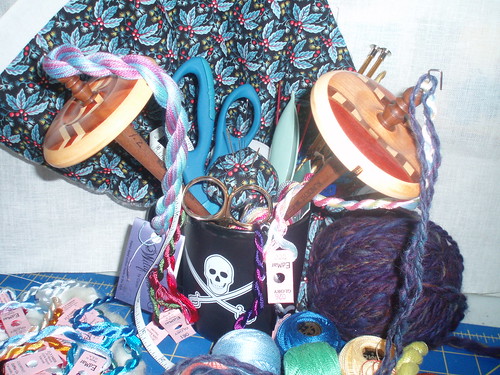
Some crafters posted a photo of their mugful:

Poll Results
Crafters at etsy.com, several flickr.com groups, and right here at www.SimpleMakes.com voted on the top 3 tools they’d have to keep.
The Top 3's Top 3:
Scissors (over half the crafters would include scissors), knife or other cutter, and, to my complete surprise (since I never use them in crafting), pliers!
Complete results (by % of crafters who'd include each in their top 3):
58% scissors
39% knife or cutter
32% pliers
25% writing utensil (pen, pencil, chalk)
25% ruler
21% knitting needles
18% tape measure
18% sewing or embroidery needles
14% seam ripper
14% paint brush
11% crochet hook
11% pincushion
7% small torch
4% hammer
4% chopstick
4% glue
4% stitch markers
Of course, responses were biased based on particular trades... I wouldn't suggest building a craft supply emporium based on these numbers! Do enjoy the stats, though; it's fun!
...and you?
Whether you do this as a mental exercise or actually pull out a mug, go through your stash, and try to stock it with just the essentials, it is a helpful activity that aids in simplification priority-making. Do you really need to keep all three size H crochet hooks?
Using the options in the poll results above, comment on this post with your top 3. If you take a photo, post it on our flickr group.
Enjoy!
What craft books are the best to keep around? When do you know you have enough? A confession, a solution, and some recommendations to help you simplify your selection of crafting how-to books.
A Solution
Here are a few useful tips I’ve found to keep my book pile under control.
1. Keep the best, and only the best - I keep comprehensive books that I refer to often instead of those which just have one pattern I like. The same “if you haven’t enjoyed it in the past year, let someone else enjoy it” rule applies here.
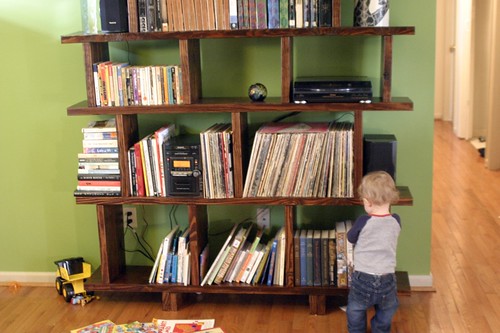
2. Don’t keep more than you can store - If your books no longer fit on their designated shelf, you may need to get rid of excess books, not buy more shelving!
3. Borrow & share - Use libraries, your friends, and online organizations like Bookcrossing. This way, you rotate fresh ideas in and out of your library, keeping only the most useful and passing along those that someone else can better use.
Recommendations
As promised, I’d like to share recommendations from my bookshelf and other crafters'. With just these few, I (or whomever) have all the information I need for almost every project I encounter:
#1 for hand embroidery: Complete Guide to Embroidery Stitches
#1 for sewing: Sew Everything Workshop


#1 for jewelry: All Wired Up
#1 for soapmaking: The Everything Soapmaking Book

...and you?
What craft book could you not do without? Comment with the type of craft and your book recommendation. You can also take a picture of your craft books, organized or chaotic, and post them on the Simple Makes flickr group!