I found this forum thread on WiseBread.com forums several months ago and have followed it ever since. Go check it out and join the discussion: do people live simply because they enjoy the simple life, or because they 'can't any do better'?

...and you?
I'd love to see a lively debate in the comments section right here, as well, so comment away!
Most crafters agree they have too much craft stuff lying around, but share an organizational problem: what to do with it all? A challenge & poll led to netizen crafters' brainstorming & creativity, plus some interesting stats!
The Mugful Story
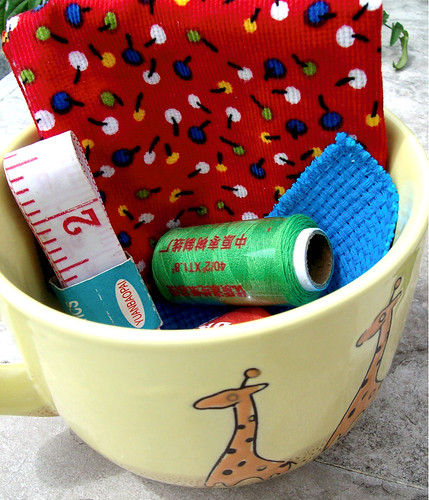
I recently began using mugs to store smaller, more frequently-accessed craft tools. This puts everything in one place while allowing me to add a fun, but functional, decor item to the room.
As I enjoyed my new crafting organization, I wondered: if all I kept to craft with had to fit in this mug, what would stay? What would go? The mug no longer just said "storage solution" to me, but also "simplify."
I asked online crafters how they would simplify their craftroom (or corner of the living room, or wherever) if they could only keep one mugful of craft tools. By “tools,” I excluded supplies (such as bolts of fabric) as well as equipment (like sewing machines).
Some crafters posted a photo of their mugful:


Poll Results
Crafters at etsy.com, several flickr.com groups, and right here at www.SimpleMakes.com voted on the top 3 tools they’d have to keep.
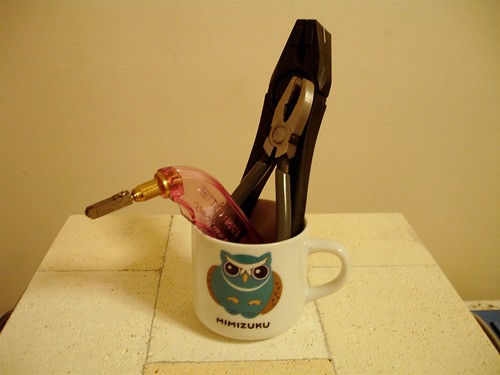
The Top 3's Top 3:
Scissors (over half the crafters would include scissors), knife or other cutter, and, to my complete surprise (since I never use them in crafting), pliers!
Complete results (by % of crafters who'd include each in their top 3):
58% scissors
39% knife or cutter
32% pliers
25% writing utensil (pen, pencil, chalk)
25% ruler
21% knitting needles
18% tape measure
18% sewing or embroidery needles
14% seam ripper
14% paint brush
11% crochet hook
11% pincushion
7% small torch
4% hammer
4% chopstick
4% glue
4% stitch markers
Of course, responses were biased based on particular trades... I wouldn't suggest building a craft supply emporium based on these numbers! Do enjoy the stats, though; it's fun!
...and you?
Whether you do this as a mental exercise or actually pull out a mug, go through your stash, and try to stock it with just the essentials, it is a helpful activity that aids in simplification priority-making. Do you really need to keep all three size H crochet hooks?
Using the options in the poll results above, comment on this post with your top 3. If you take a photo, post it on our flickr group.
Enjoy!
Note: Welcome visitors from SimpleMom.net, which just so happens to be my favorite blog to read myself! Check out this list of some top Simple Makes posts in several categories, and subscribe to the RSS feed so you can get upcoming posts like this on composting and green living, plus simple living in home, family, and crafting!
Interested in composting, but stuck with small quarters and no yard? These how-to guides walk you through each step which I myself use for my windowsill compost pile. Start composting now, and share your success!

Basic Steps in Composting
Click each link below to read that step’s how-to guide.
1. Make a container to hold your compost pile.
2. Layer your container with brown and green materials.
3. Maintain your compost pile weekly.
4. Use your compost.
5. Remind yourself of what to do with my downloadable Composting Guide.
Also see...
If you’re not convinced that you should be composting, check out livingsoil.co.uk
If you want to know all the science-y reasons why this works, see this article
...and you?
If you compost already, what do you think of these steps? What steps do you take in composting?
If you haven’t composted before (or lately), will you start now? Does it sound easy enough? If you’re not interested, what’s keeping you from doing it?
Comments and praise, doubts and criticism all accepted :-)
Your photos of compost piles, compost-happy plants, and composting families in action (with a link to this post in the photo description or as a comment) are all welcome at our flickr group... photos with Creative Commons licensing may be featured in future articles with a link to any of your websites you’d like to promote!
What craft books are the best to keep around? When do you know you have enough? A confession, a solution, and some recommendations to help you simplify your selection of crafting how-to books.

A Solution
Here are a few useful tips I’ve found to keep my book pile under control.
1. Keep the best, and only the best - I keep comprehensive books that I refer to often instead of those which just have one pattern I like. The same “if you haven’t enjoyed it in the past year, let someone else enjoy it” rule applies here.
2. Don’t keep more than you can store - If your books no longer fit on their designated shelf, you may need to get rid of excess books, not buy more shelving!
3. Borrow & share - Use libraries, your friends, and online organizations like Bookcrossing. This way, you rotate fresh ideas in and out of your library, keeping only the most useful and passing along those that someone else can better use.
Recommendations
As promised, I’d like to share recommendations from my bookshelf and other crafters'. With just these few, I (or whomever) have all the information I need for almost every project I encounter:
#1 for hand embroidery: Complete Guide to Embroidery Stitches
#1 for sewing: Sew Everything Workshop


#1 for jewelry: All Wired Up
#1 for soapmaking: The Everything Soapmaking Book

...and you?
What craft book could you not do without? Comment with the type of craft and your book recommendation. You can also take a picture of your craft books, organized or chaotic, and post them on the Simple Makes flickr group!
 As much as I'd love for you to visit Simple Makes daily, I can't really imagine you running with a handful of vegetable peels from the kitchen to the computer to make sure you're putting it in the right layer!
No worries. Enter my Composting Guide, a free printable how-to! I've compiled the important highlights from all the Start Apartment Composting articles into a one-page chart. Here you'll find reminders on what to do each week as well as lists of what's okay and what's a composting no-no. Print it out (in grayscale, for the color ink cartridge conscious) and tape it up near your pile. Simple!
And, since I've used the same Creative Commons license for the PDF that all www.SimpleMakes.com text is under, you can share it as much as you like, so long as you attribute it to "Lori Ann Gregory of www.SimpleMakes.com"!
It’s a beautiful transformation when those old, fungus-ridden veggie peels and cotton dryer lint become a dark, nutritious, earthy compost. But... not beautiful enough to frame. The beauty is in compost’s function, and here, I’ll give you mini-recipes for the 3 simplest ways to use your compost. Enjoy!
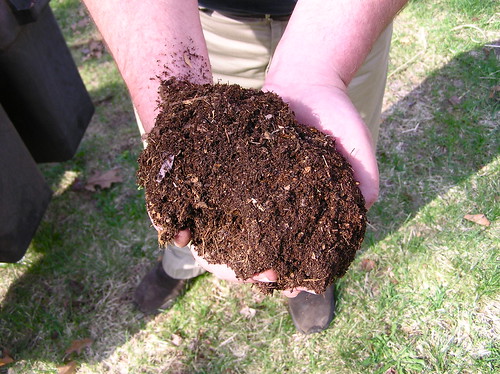 better compost by normanack on flickr
* dark brown or black in color
* soft
* crumbly
* mostly smooth (you can throw that stubborn corncob back in the pile)
* earthy-smelling
I’ve read estimates that you will have useable compost anywhere from “4-6 weeks” to “3 months” based on the size of your pile, but I don’t keep track; as long as you maintain the pile weekly, it should be clear when it’s ready.
Here are 3 mini-recipes to use your compost:
Plant Seeds
Make a potting mixture of 1 part compost to 3 parts soil and put in pots, about an inch short of the brim. Plant your seeds in these pots just as you would any other soil.
Plant Seedlings
Plants that already have roots can handle more compost, so your potting mixture for seedlings or transplanting plants can be 1 part compost to 2 parts soil.
Nourish Established Houseplants
If your potted plants (or flowers, herbs, vegetables) are already growing, use the compost with nothing added and sprinkle on the surface of the dirt. (If you don’t have room, you can shovel out a layer of the dirt that’s already in the pot and replace it with the compost).
What to plant?
I use all my compost for my herb gardens - we have pots in the living room, kitchen, bedroom, and the staircase landing outside our apartment. Stay tuned for an upcoming post!
More on Composting
This post is step 4 in my Start Apartment Composting series. Check it out to see all the steps, plus a free printable guide to hang near your compost pile.
...and you?
What recipes do you use your compost with? I’m especially interested in “compost tea” - I’ve never tried it but would if I had some simple instructions!
Still accepting photos (with a link to this post in the photo description or as a comment) at our flickr group... photos with Creative Commons licensing may be featured in future articles with a link to any of your websites you’d like to promote!
This is step 3 in our Start Apartment Composting series. If you’re new here, see the original composting post. For all you already composting (through this series or otherwise), “Maintaining your Compost Pile” gives you the know-how for what you do as time goes on with your compost pile. This is probably the easiest step, so don’t fear - just read on!
 compost by collinanderson on flickr
Weekly Maintenance
Either as you add materials or on a set day each week (say, the day you clean the kitchen, if it’s in the kitchen windowsill), you’ll want to see how things are going and nudge it along in its composting. Here’s what to do:
* Stir or “toss” the pile, perhaps with a small hand shovel, to work air into it.
* Water it if it seems dry.
* If your pile is cold (composting piles should feel warm when you put your hand over them, especially after stirring the pile), add more green material.
* If your pile stinks (it happens, but you can prevent it), add more brown material.
* If you notice worms or white fungus - do nothing! These guys are great composting assistants.
That’s it! Really! Just keep adding, keep maintaining, and when you realize that your pile (or a lot of it) has become dark, soft, and earthy-smelling, you’re ready for Step 4.
...and you?
How’s your compost pile doing? Are you finding composting (whether you’re using SimpleMakes how-to’s or you’ve been doing this for years) easier or more challenging than you expected? Are you glad you’re doing it?
Don’t forget to add your composting photos (with a link to this a post in this series in the photo description or comments) to our flickr group... and, as always, photos with Creative Commons licensing may be featured in future articles with a link to any of your websites you’d like to promote!
This is step 2 in our Start Apartment Composting series. If you’re just checking in, see the first post. For everyone else, this how-to provides the nitty-gritty details of what you actually DO to compost!

You have your compost pile container from Step 1. What now?
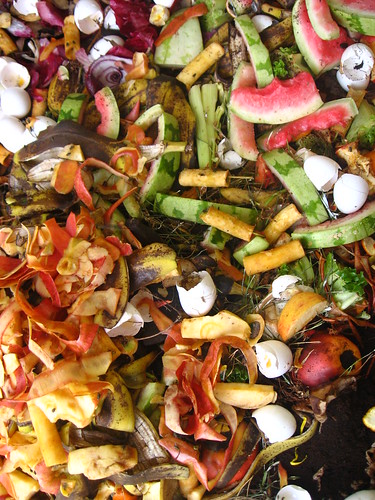
It’s all about the Green and the Brown. Green and Brown materials are the two categories of what you put into your container - these are the materials that will break down, leaving you with that wonderful compost!
Every day as you go about your life, cooking, cleaning, and otherwise living, you’ll run into these materials that you don’t need. They’ll either fit into the “brown” or the “green” materials category. Following the guidelines below, you’ll throw them in the container, and watch your scraps compost themselves! Here’s how.
First, here are the basic rules you’ll follow in composting:
* Shred material before adding in to the pile. I try to get thick materials to the size of my thumb and flat materials (paper) postage-stamp sized.
* Keep the pile moist by adding water when it seems dry.
* The bottom and top layers should be brown materials (to keep it from stinking).
* There should be an approximately 50/50% ratio of green to brown material.
* Let it breathe (don’t fill it up to the lid).
* Don’t put anything in it you don’t want in the end (i.e., don’t throw weeds that have seeds in there if you don’t want ‘em in your houseplants you’ll later add compost to)
Brown materials:
* dead leaves * pine needles * straw * sawdust (from untreated wood) * wood chips * dirt * newspaper * twigs * tree bark * cardboard & toilet paper rolls * hair * fur * dryer lint (assuming it’s not chemical-ridden) * cotton cloth (old rags, socks)
Green materials:
* grass * fruit scraps * veggie scraps * eggshells * coffee grounds * tea leaves * tea bags * nut shells * trimmings from most trees and plants
NO-NO’s:
(i.e. DON’T add these - some won’t compost, some attract rats, some negatively affect your finished product i.e. plants you add compost to)
* meat * bones * fat * oil * grease * black walnut leaves or twigs * chemicals like pesticides * dairy products * human or pet waste * flour * food sauces * ashes * charcoal * nonorganics (like plastic) * diseased or mildewed plants * weeds
It’s an art, not a science.
While that’s probably technically inaccurate, my point is that you’re making a composting pile to add to what you do in your home, not to suck the life out of it. Don’t stress. You’ll learn what you can tinker with and what you shouldn’t. You can’t get that corn cob any smaller? Shrug and throw it in there whole. It’ll compost eventually. No time to shred up some old toilet paper rolls after throwing in a bunch of fruit peels? Worry about it later. Has your pile been dried out for a week? Water it, and move on. Enjoy composting; don’t be enslaved to it.
...and you?
How does it sound? Manageable? Complicated? Don’t worry about keeping up with the brown/green/no lists - they’re all in my all-inclusive Composting Guide - you can print it and hang near your pile.
Comment with your thoughts on the feasibility of implementing a compost pile into your home life - questions are welcome, too!
Composting photos (with a link to this post in the photo description or as a comment) are welcome at our flickr group, and photos with Creative Commons licensing may be featured in future composting articles! I’ll thank you with a link to any website you have which you’d like to promote.
Want to start composting, but no yard space available? Stores sell special indoor compost pile containers, but the cost can be prohibitive. Here’s how to make your own windowsill compost bucket, step 1 in our “Start Apartment Composting” series.

For a windowsill compost pile, you need a container that:
* holds the compost in (unlike a pile in your yard, which can be more loosely “contained”)
* keeps everything wet (not TOO many holes)
* allows for ventilation (we’ll add holes in Step 2)
* has a capacity greater than the amount of compost you’ll have in it at any one time
* fits in your windowsill, or wherever you want it
We chose a cheap plastic bucket with a lid to keep it from drowning during the rainy season. It’s thick enough plastic to be sturdy, but thin enough that it was easy to poke ventilation holes in it. Ours is 22cm in diameter and 19cm tall - not quite large enough for the amount of scraps our 2-person family produces, but the perfect size for our windowsill, so we make do.
Step 2 - Alter the container
You need air to flow though your pile to get all the chemical stuff I don’t understand to start happening. Use something sharp you already have around your house, like a screwdriver, to poke holes in your container. Be careful - avoid poking holes in yourself. We poked small (pencil-diameter sized) holes every 10cm around the sides and evenly spaced 5 holes in the lid and the bottom of the bucket.
note - Poking one of the holes, we accidently split a good 15 cm long crack into the plastic... if you do this, don’t worry; it really doesn’t matter so long as there’s not an actual chunk out of the side big enough to let compost fall out. We’ve used our bucket for months with no problems.
Step 3 - Place the container
When choosing where to put your pile, consider:
* It’s really best for your container to be outside. Once it becomes compost, the pile gets a quite pleasant, warm, earthy smell... but before that, it sometimes stinks (especially if you don’t have enough brown material).
* The pile should receive as much sunlight as you can get it.
* You want your pile accessible from wherever you produce food scraps (to avoid carrying dripping vegetable peels across your home).
For me, the kitchen windowsill, which gets sunlight all afternoon and is easy to access when cooking, is the best option. However, don’t give up - just be creative - if that won’t work for you... put it rooftop, on a balcony, on your doorstep... anywhere you can access it without it getting in the way.
What now?
Well, a bucket won’t do much to produce compost on its own. See the next post in this “Start Apartment Composting” series, “Composting How-to: Green and Brown.”
...and you?
What compost pile container do you use? What do you recommend? Snap a picture of yours and upload to our flickr group for a chance to have it featured!


