
I'm away, but wanted to introduce you all to a website I've been using more and more lately. Check out SpringPad and play with it for the next few weeks; I personally use the Weekly Meal Planner, Date Planner, and several others.
When I come back, I hope to post some ways you can use SpringPad in conjunction with SimpleMakes posts. Think one-click grabbing the content from the Efficient Packing List into a SpringPad list you can customize and use as your own!
Whether a recipe made too much or just took a lot of work, storing more for later is always a great way to simplify your baking routine. Use my "Bread for Later" guide to make sure it still tastes great!

Step 1: Make Bread (or buy it - try a bakery thrift store)
All these tasty, simple recipes produce breads that freeze well.
My favorite bread book, Artisan Bread in Five Minutes a Day, teaches a technique that allows you to make bread dough, in as large a batch as you'd like, and store the dough in the refrigerator to quickly make whenever you want fresh, warm bread.
 , teaches a technique that allows you to make bread dough, in as large a batch as you'd like, and store the dough in the refrigerator to quickly make whenever you want fresh, warm bread.
Step 2: DON'T refrigerate it
Refrigerated bread goes stale more quickly. Really. Don't refrigerate it. The common myth that "refrigerated bread lasts longer" continues because refrigerated bread DOES mold slower, but if you follow these instructions, you won't have stale OR molded bread.
Don't believe me? Read here, here, here, and here.
note: if you have a custard or meat-filled bread, you can't leave it out at room temperature. freeze it (step 3 "for later") or refrigerate it for as short a time as possible.
Step 3: Separate "for now" from "for later"
Keep out however much bread you'll be able to eat in the next two to three days, or however long it will last before going stale or molding.
Freeze the "for later" bread. Wrap it in an airtight container (even a plastic ziptop freezer bag will work; we keep one bag for muffins and reuse it over and over). If it's a loaf, you might want to slice it first because it will be hard once frozen. If you'll remove the entire loaf, thaw, and gift, then it doesn't matter. You can keep bread frozen for three or more months.
Take a look at your "for now" bread. Does it have a crusty outside, or is it soft all over? Crusty breads should be stored in a paper bag, not an airtight container. Sometimes I just cover mine with a kitchen towel. Soft breads, like sandwich bread, are best kept in plastic, either the plastic bag it came in or a plastic container. I've been told that ceramic bread boxes are really the best solution for any type of bread, but I've never had one myself so I can't be sure. (Anyone have experiences to share?) If you just baked your bread, wait til it's room temperature before you store it in anything.
 are really the best solution for any type of bread, but I've never had one myself so I can't be sure. (Anyone have experiences to share?) If you just baked your bread, wait til it's room temperature before you store it in anything.
Step 4: Warm it
Thaw frozen bread at room temperature. This means you need to plan ahead. If you need a few slices immediately, you can eat them as toast. Use a toaster or oven for a few minutes, watching til it looks crisp.
Room temperature bread (whether stored "for now" bread or frozen "for later" bread that has thawed) can be warmed in the microwave as long as you add moisture to keep it from getting tough. Here are ways I reheat slices of bread:
* Place the bread on a wet paper towel. Microwave, checking every 30 seconds.
* Toast in the oven.
* Microwave in a bowl with butter on top of the bread, checking every 30 seconds.
* Microwave on a small plate, checking every 30 seconds. Put a glass of water in the microwave. The steam will keep the bread moist.
Step 5: Repurpose It
Try as you might, sometimes you'll miss and your bread will go stale.
Thankfully, Italian food, restaurants, and smart bloggers all use stale bread. Give their ideas a try!
...and you?
How do you store your bread? Any more ideas for repurposing stale bread? Share your ideas in the comments! Links to posts you've written are welcome!
Busy people + the need for storage can all too easily equal clutter. Here's the good, the bad, and the how-to make it better from my own desk drawer experience.
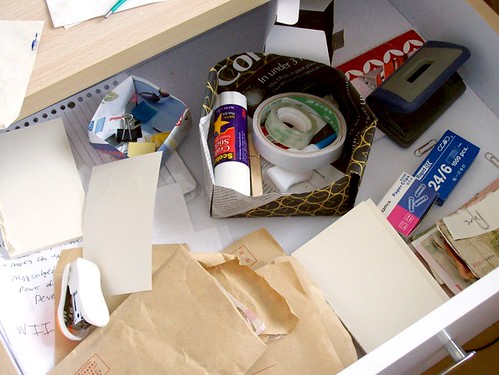
Home from vacation, it didn’t take too long to discover the dreaded desk drawer that’d become a cluttered toss-all pile weeks before we left. Looks like a home organization job to me!
I took the picture above for memory's sake before digging in.
Though not as visually frightening as some, it wasn’t working out; we spent too much time with a hand in that drawer.
The good:
Organizers (the little boxes) within organizers (the drawer) work well. Most notecards are neatly stacked. Money is either in envelopes, or paper-clipped with labels.
The bad:
Some items (stapler) are on top of unrelated items (envelopes). Loose items (paper clips) have no home. A pile of used paper meant for reuse keeps growing under the envelopes because it’s easier to get to the (store-bought, i.e. not free) notecards. The larger box is made of newspaper, so its sides don’t hold up very well.
The desk-drawer clutter $0.00 solution:
The how-to:
First, I made some decisions: “Will I really ever use this?” Though I may, someday, want a 6.75x4” piece of paper, I’ll likely be fine with just one size. I took the largest paper and divided it in 4. Just fold and tear - no need for smooth, perfectly straight edges. I took all the other paper and tore them to the same size. Smaller scraps will become recycled paper later. I clipped the new notes together and decided not to keep more than will fit in the clip - excess will be recycled too. We won’t need to buy notecards anymore, either (frugal bonus!)
Second, I got rid of loose items. I put some paperclips and staples in the smaller box. Large items go in the new, sturdier large paper box.
Third, I combined rarely-used items out of the way. See the white box in the corner? The lid was always cumbersome when I just wanted to grab or put away something, so I tucked it and the flaps inside the box. Since I have staples and paper clips out (second step), I won’t often need their boxes, so they’re tucked away back there, too. Several cards that previously floated around the room are now stuck upright in that box.
Fourth, I oriented items so nothing important overlaps. It turns out the envelopes fit better longways, for example.
Fifth and lastly, I did a visual check. Because the colorful collections of items were all on the right side of the drawer, I switched the new notepad paper with the newspaper box. Not a big deal, but it looks a little better this way.
That’s it!
...and you?
What’s your $0 organization solution that saves you bits of your precious time here and there, time that adds up? Comment for a chance to have your tip featured here on Simple Makes! Or, reorganize your desk drawer and post the before-and-after at our flickr group.

What craft books are the best to keep around? When do you know you have enough? A confession, a solution, and some recommendations to help you simplify your selection of crafting how-to books.

A Solution
Here are a few useful tips I’ve found to keep my book pile under control.
1. Keep the best, and only the best - I keep comprehensive books that I refer to often instead of those which just have one pattern I like. The same “if you haven’t enjoyed it in the past year, let someone else enjoy it” rule applies here.
2. Don’t keep more than you can store - If your books no longer fit on their designated shelf, you may need to get rid of excess books, not buy more shelving!
3. Borrow & share - Use libraries, your friends, and online organizations like Bookcrossing. This way, you rotate fresh ideas in and out of your library, keeping only the most useful and passing along those that someone else can better use.
Recommendations
As promised, I’d like to share recommendations from my bookshelf and other crafters'. With just these few, I (or whomever) have all the information I need for almost every project I encounter:
#1 for hand embroidery: Complete Guide to Embroidery Stitches
#1 for sewing: Sew Everything Workshop


#1 for jewelry: All Wired Up
#1 for soapmaking: The Everything Soapmaking Book

...and you?
What craft book could you not do without? Comment with the type of craft and your book recommendation. You can also take a picture of your craft books, organized or chaotic, and post them on the Simple Makes flickr group!

 Posts
Posts


